
Introduction #
In order for a business to sell stock, it will need to be purchased first.For purchases to be correctly tracked on the system, functionality exists to track and store Vendors, Orders to vendors (Purchase Orders), Recieved Goods Invoices (Recieve Goods), Additional costs that apply to those purchases (Charges, Landed Costing), as well as keep track of vendor invoices outstanding an paid (Vendor Journals).This article will step you through each module involved in purchasing cycles.It is strongly recommended that the (Add link to Inventory Management here) article is read first.
Vendors, Vendor Settlement (Payments to vendors) & Debit Notes. #
Vendors (Suppliers) are the entities from which you purchase anything related to the business; As all purchases should be processed on the system for accurate bookkeeping and reporting, a vendor should be created for all entities that were purchased from.
1.1 Creating a vendor #
- Navigate to Administration > Vendors to open the Vendor Master Screen
- Use the Add New Icon to create a new vendor; Alternatively, you can use the filters to search for a vendor or press search without filters to display all vendors.
- The edit icon can then be used to update vendor details.
- The Vendor details available for capturing are split into 7 sections explained below :
- Vendor
- Address.
- Mobile No.
- Contact Details.
- Bank Account Details.
- Accounting.
- Vendor Memo.
4. Press Save
5. Creating vendors accurately with as much detail as possible is essential to the growth and maintenance of the business; It allows new employees to seamlessly integrate with their new jobs should it involve purchasing or creditors, as well as current employees having all the information they need preventing a back-and-forth conversation to simply retrieve information such as contact details or bank account numbers, etc.
1.2 Vendor Settlement #
Each time a transaction is made for purchase-related transaction, the system will always prompt for a vendor. These transactions are captured in a vendor journal where a user can view and settle them using various methods.
Settling Vendor Invoices
- Navigate to Purchases > Vendor Settlement.
- Search for a particular vendor either by Vendor Code or Vendor Name; Alternatively, you can press search without any values to list all vendors.
- The grid will display the Total Purchase amount, Total Payment Amount, Open amounts, and the Current Balance for each vendor retrieved.
- Click on a vendor and the RHS (Right Hand Side) will populate with the current creditor’s information and balances, along with three buttons ( SHOW INVOICEWISE DETAILS, SHOW LEDGER, PAY) and a checkbox (Show Allocated Invoices).
a) Show invoice wise details
The grid will populate with all open invoices, simply tick all the invoices you would like to settle and press PAY; Alternatively, you can tick one invoice and enter the payment amount in the PayAmount field.
When making a partial payment, enter the amount in the PayAmount field and make sure to set the discounts to 0 as the system automatically writes off the unpaid value to the discount field.
b) Pay
when using the pay functionality, you can capture a payment not relating to any invoice. This payment will appear as an entry in the Previous Overpayments section. To allocate this payment to an invoice/s, tick the entry in the Previous Overpayments section, tick all the invoices in the Open Invoices section you would like to allocate this payment to and press Allocate.
c) Show ledger
Posibolt allows you to quickly view all the vendor’s invoices. For a particular vendor, click on Show Ledger. As for any reports, you can add filters and sort the information to identify exactly what you are looking for.
d) Show Allocated Invoices
This will display all the invoices which have payments allocated to them.
1.3 Debit Notes #
A debit note is a document issued to a vendor to formally process a credit claim for the account held with the vendor
- Navigate to Accounting > Debit Note
Image of the Debit note screen
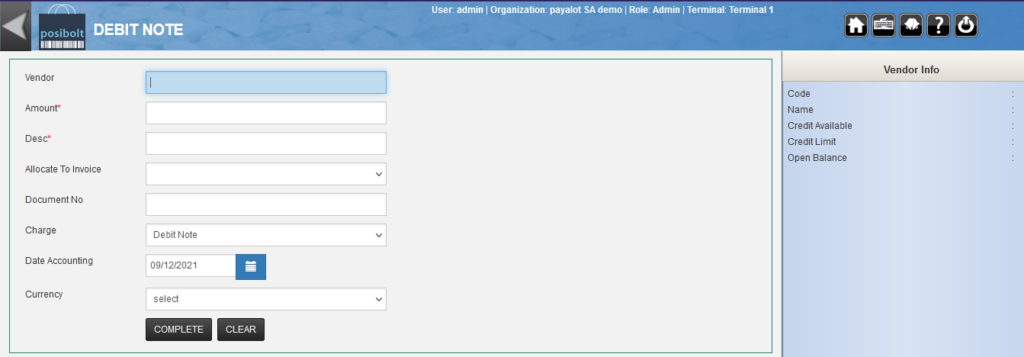
- Vendor: Select the vendor to whom you are going to create a debit note.
- Amount: Field to enter the debit amount.
- Desc: Additional information used to describe the reason for the debit note.
- Allocate to Invoice: You can choose the vendors invoices from the drop down that you wish to allocate the debit note to ,if any.
- Document No: Enter the document number if applicable.
- Charge: To track the entry. Also, its account posting will be to the selected charge account.
- Date Accounting: Can be entered with back date too.
- Currency: You can choose the currency from the dropdown menu if the vendor is configured with foreign currency.
- Press Complete to finalize the debit note, a pop-up displaying the balance before and after the debit note will appear for confirmation.
- The debit note can be printed (downloads as .pdf) and can be emailed to the supplier.


